I could not resist working some more on the car.
So I did.
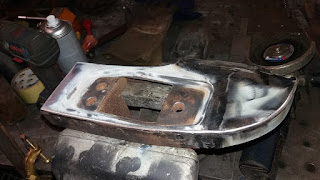
And I started with some more work on the piece I started yesterday. Hammering, shrinking, bending, cutting and comparing it against the old part.
Then some more and some welding and voilà a new part is finished.
Next I drilled some holes and painted it for rust protection.
Then the welding started.
After the welding was finished I did some grinding and some final shaping to get it near perfect. Then some paint was sprayed on to protect it.
So next I started with the left corner.
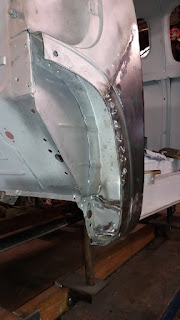
After cutting the outside part away you are able to see what damage the rust had done to the metal behind.
I cut out the bad part and made a new piece that fit right in.
Welded it in place and ground the welds flush.
And then painted it.
Next time I will make the last part for this cabin.
Saturday, December 31, 2016
Friday, December 30, 2016
Dashboard.
At last I had a day to do some more work on the car.
So I prepared a good part of the piece that I cut out earlier to get access and welded it in place.
Then I made a new part to replace the bad part of that piece and tacked it in place.
Then I ground all welds flat and applied some protective paint. This is looking much better than it was before.
Some time before Christmas the new dashboard arrived. So I prepared it and held it in place with some vise-grips and some bolts to check the fitment of the part.
And then I welded it in place and ground all the welds. On to the next thing.
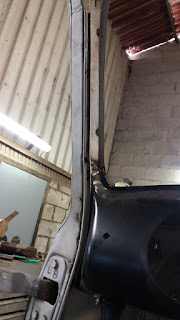
In the picture above you see a rail on the edge of the door opening. That rail was straightened and welded back in place. It was previously removed to get out the side panel.
Same thing with the other side. After welding the welds were ground flush.
Next I started with the rear right corner of the cab. A piece was cut out. It was badly pitted and full of tiny holes.
First I selected a piece of plate big enough for making a new part.
It was cut to shape and then I started with the rough shaping of the part.
After some time pounding shrinking and stretching the part is taking form.
We are not there yet but we are getting close. It will take some more time working the metal to have it like the original but we are getting there.
So I prepared a good part of the piece that I cut out earlier to get access and welded it in place.
Then I made a new part to replace the bad part of that piece and tacked it in place.
Then I ground all welds flat and applied some protective paint. This is looking much better than it was before.
And then I welded it in place and ground all the welds. On to the next thing.
In the picture above you see a rail on the edge of the door opening. That rail was straightened and welded back in place. It was previously removed to get out the side panel.
Same thing with the other side. After welding the welds were ground flush.
Next I started with the rear right corner of the cab. A piece was cut out. It was badly pitted and full of tiny holes.
First I selected a piece of plate big enough for making a new part.
It was cut to shape and then I started with the rough shaping of the part.
After some time pounding shrinking and stretching the part is taking form.
We are not there yet but we are getting close. It will take some more time working the metal to have it like the original but we are getting there.
Monday, December 19, 2016
The chassis
Today I transported the Chassis of the pickup to an other location.
It is sandblasted primed and painted black.
Waiting for the next step.
It is sandblasted primed and painted black.
Waiting for the next step.
Saturday, December 17, 2016
A-pillar nr 2
Today we first started with Welding in some struts to hold the car together.
Then a large piece of metal was cut out to get access to the parts behind it.
Next we cut off a bad piece of rail ( rusted trough) and replaced it with some new plate.
Next a piece of the floor that has holes in it was cut out and new plates ar made and tacked in place.
Then a piece of metal was formed bent cut and welded to extend the lower part of the door rail.
Then we tackled the part that was cut out. We cut the larger piece up in small sections to be repaired. and this parts was first. On the picture below the new parts of metal are tacked in place.
Then the big sheet with the holes in it.
We cut it in pieces and kept the good part. Then we cut a plate and formed it into a new piece and that was tacked to the old one.
Then the seems is fully welded ground a painted and put aside.
We the welded the part we made earlier and finished it an painted it.
Then the part that is part of the A-pilar where the bottom hinge is mounted. The lower portion was repaired and new metal welded in place.
After The paint had dried we mounted all the pieces together and tacked them in place. We've taken some measurements to be sure everything is in place where it needs to bee and started the welding process.
The inside and the outside.
We are now ready to do some grinding and make the last part to put in place.
But that will be for another day.
Sunday, November 27, 2016
A-pillar finished
What working on a Sunday? Well this working is kind a relaxing to me.
The first thing I did was finish welding the panels I tacked in.
Then Those welds are ground flush.
Then my attention turned to the firewall. On the bottom near the floor there were some cracks. I welded them. And I also removed some dents on top of the bow you see below.
I also made a plate with a bracket for bolts welded on to replace a big hole where ones was an anchor point for the fender reinforcement. The hole was cut out larger and the plate was bent and cut to fit. Al this was done after I took some measurements son I could mount it to the exact location.
After fully welding the welds were ground flush.
And then all the bare metal was sprayed with a protective coat of paint.
Saturday, November 26, 2016
Rolling frame
Today I made a frame with wheels so I'm able to move the cabin around.
I made it sturdy enough to give it good support so it will not bend the cabin.
I made it sturdy enough to give it good support so it will not bend the cabin.
Thursday, November 24, 2016
Making the curb
Yes. After my car was repaired I had some time left to do some tinkering.
Before I can resume to the metal work I need to know how the lines are coming out with the door. So I installed the door and did some aligning to try to get the gaps even. For know The lines of the panels are good. Just the height opposed to the door are a little bit low. The low spots are marked and the measurements are made to correct this ones the door is removed.
So next I installed the fender to see where my lines are and what the curb of the rest of the panel needs to bee.
The Fender was then removed and a piece of metal was shaped by hand and using the bead roller and stretcher. Then the part was tacked in place making sure that the curve follows the line of the door.
The fender was installed again to check the gap between the panel and fender.
To close that gap I had to make some cuts and weld in some pieces of steel.
The next step will be removing the door and fender and finish weld the entire panel.
Saturday, November 19, 2016
Making more new parts.
Today I started early. The part I tack welded earlier was welded grounded and hammered to flatten it again.
I then applied some galvanic paint to protect it from rust.
On to the next part. This part is part of the door post , the underside where the bottom hinge is attached. This part was cut out earlier to give better access.
The bottom is almost rusted away.
After some grinding welding and forming it looks much better.
It also got some protective paint. Next on the list is the part to witch the outer skin is attached and to witch the fender is bolted to. As you can see the bottom is almost completely rusted away.
And this is how the part looks now before paint.
Next a piece of the floor and firewall are cut out. They were rusted trough.
This is what the repair looks like.
Then it was time to weld some parts to the cabin again. I started with the bottom of the door post. It is tacked in place and alligned.
Next is the inner plate that I made as first. Tacking it in place and finishing the welds.
And then the last part to witch the fender is mounted. This piece had to be cut again to make it fit to the fender and car. After the welds are finished this is what it looks like before paint.
This is a view from the inside. There are no more holes.
So next I started with the fabrication of the last part. The outer skin. After some cutting forming and bending I tacked the first piece in place.
The next piece will be for a later date. And it needs to be checked with the door it should align perfect before finishing the welds.
Subscribe to:
Comments (Atom)


